


Hello everyone! , this is my very first blog here at Hashnode so I'll start with a little introduction :
I am an Android Developer who has just started implementing Android development skills as a full-time developer, as the popularity of Kotlin is increasing day by day I thought to get my hands on one of the multiplatform frameworks of Kotlin which is Ktor.
Ktor is a framework for building asynchronous, event-driven client and server-side applications since ktor is built in Kotlin it gives a familiar feeling to Android developers. So basically, Ktor is a go-to framework for Android developers who want to build their backends.
I'll be starting with some of the basics in building a backend using Ktor and this blog here is all about authenticating and authorizing the requests received at the backend and also how would we encrypt the user's sensitive information and save it in a database.
Before we start with the implementation let's get familiar with the concepts/libraries we'll be using to achieve our goal :
JWT ( JSON Web Token ) is used to ensure that the data between client and server is being transmitted in a tamper-proof way.
Hashing: It is the process of transforming our data into a fixed size of the unreadable string, we'll be saving the hashed value of the user's password in the database so even if anyone gets access to the database, they won't be able to figure out the password.
Salting: A salt value is used along with the hashed value to increase the security of our data, as the hash value alone can get un-hashed but concatenating a salt value ( which is generated by us) to the hashed value gives a very tough time to the hacker.
Let's start now,
Step 1: Creating the project.
Create a Ktor project from start.ktor.io
Do not forget to add these plugins: kotlinx.serialization, Authentication JWT and routing.

Generate the project, unzip the file and open it in IntelliJ Idea.
Step 2: Creating the classes.
We'll start by creating the project structure and organise our classes.
Step 2.1: Setting up the hashing service.
We'll be using an interface approach here because if you would want to change the class that I'll be using here for hashing in the future then there would be no need to change the whole implementation.
Abstraction of our hashing class :
interface HashingService {
    fun generateSaltedHash(value : String,saltLength : Int = 32) : SaltedHash
    fun verify(value : String,saltedHash: SaltedHash) : Boolean
}
The verify function here plays a key role, as we're saving the user's password in an encrypted format, so at the time of login, we need to again encrypt the password entered by the user and check if it's similar to the encrypted value in our database.
Implementation of HashingService:
class SHA256HashingService : HashingService {

    override fun generateSaltedHash(value: String, saltLength: Int): SaltedHash {
        val salt = SecureRandom.getInstance("SHA1PRNG").generateSeed(saltLength)
        val saltAsHex =  Hex.encodeHexString(salt)
        val hash = DigestUtils.sha256Hex("$saltAsHex$value")
        return SaltedHash(hash,saltAsHex)
    }

    override fun verify(value: String, saltedHash: SaltedHash): Boolean {
        return DigestUtils.sha256Hex(saltedHash.salt+value) == saltedHash.hash
    }
}
SHA-256 (Secure Hashing Algorithm-256) is a widely used cryptographic hashing algorithm that belongs to the SHA-2 family of hashing algorithms.
The generateSaltValue function returns a SaltedHash data type which consists of two string values hash and salt.
data class SaltedHash(
    val hash : String,
    val salt : String
)
These 3 classes here are enough to generate a hash and salt value for a given value.
Now let's start with the token generation part.
Generating an Auth Token:
We'll be again using the abstraction method, here's the token service interface :
interface TokenService {

    fun getToken(
        config: TokenConfig,
        vararg claims : TokenClaim
    ) :String
}
The get token function takes in two parameter, TokenConfig which contains the metadata about the JWT token and vararg of claims, a claim is nothing but a piece of information that we can send along with the JWT token when authorizing our requests. The claims are sent in a key value pair.
Take a look at both data classes :
data class TokenClaim(
    val name : String,
    val value : String
)
data class TokenConfig(
    val issuer : String,
    val audience : String,
    val expiresIn : Long,
    val secretKey : String
)
Implementing the JWT service.
class JwtTokenService : TokenService {
    override fun getToken(config: TokenConfig, vararg claims: TokenClaim): String {
        var token = JWT.create()
            .withAudience(config.audience)
            .withIssuer(config.issuer)
            .withExpiresAt(Date(System.currentTimeMillis() + config.expiresIn  ))

        claims.forEach { claim ->
             token = token.withClaim(claim.name,claim.value)
        }
        return token.sign(Algorithm.HMAC256(config.secretKey))
    }
}
Two more data classes that we'll need here to map our requests and responses.
We'll be sending a username and password in the request body and receiving a token on login in the response.
@Serializable
data class AuthRequest(
    val username : String,
    val password : String
)
@Serializable
data class AuthResponse(
    val token : String
)
Configuring our routes:
An extension singUp function of the Routing library :
fun Routing.signUp(
     hashingService: HashingService,
     userDao : UserDao
){
    post("/signUp"){

        val authData = call.receive<AuthRequest>()

        val saltedHash = hashingService.generateSaltedHash(authData.password)

        val player = userDao.addNewUser(
            username = authData.username,
            password = saltedHash.hash,
            salt = saltedHash.salt,
            profilePic = ""
        )
        if(player == null) {
            call.respond(HttpStatusCode.Conflict)
            return@post
        }
        call.respond(HttpStatusCode.OK,"user data added successfully")

    }
}
Here, we're receiving our body parameter in the authData variable, using our hashing service function to generate a salted hash value for the received value, and then storing the user's data inside the database.
To know about database integration in integration check out my article here.
Let's now setup our sign in route were the JWT token will be generated.
fun Routing.signIn(
    userDetailSource: UserDao,
    hashingService: HashingService,
    tokenService: TokenService,
    config: TokenConfig
){
    post("/signIn") {
        val request = call.receive<AuthRequest>()
        val user = userDetailSource.getUserByName(request.username)
        if(user == null){
            call.respond(HttpStatusCode.Conflict,"user not fount")
            return@post
        }

        val isValidPassword = hashingService.verify(
            request.password,
            SaltedHash(hash = user.password, salt = user.salt)
        )
        if(!isValidPassword){
            call.respond(HttpStatusCode.Conflict,
            DigestUtils.sha256Hex("${user.salt}${request.password}") )
            return@post
        }

        //user logged in, generate a token
        val token = tokenService.getToken(
            config = config,
            TokenClaim(
                name = "userId",
                value = user.id.toString()
            )
        )

        call.respond(
            HttpStatusCode.OK,
            message = AuthResponse(
                token = token
            )
        )
    }
}
Here we're using our verify function to confirm if the password entered by the user in signIn route is the same one that he entered while signing up. And if the password is valid then we generate a token with a claim of the user's id and then we respond with the token generated.
Now let's see how we'll configure the TokenConfig object and initialize our routes.
Open the edit configurations dialog and setup values for the following keys that will be the meta-data for the TokenConfig object.
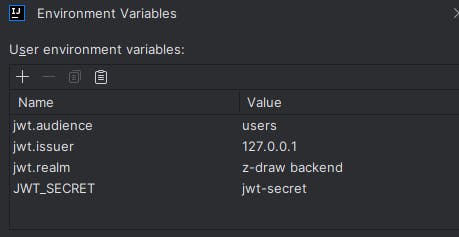
The configure security file in plugins package that was automatically generated should look like this :
fun Application.configureSecurity(config : TokenConfig) {

    authentication {
        jwt {
            realm = System.getenv("jwt.realm").toString()
            verifier(
                JWT
                    .require(Algorithm.HMAC256(config.secretKey))
                    .withAudience(config.audience)
                    .withIssuer(config.issuer)
                    .build()
            )
            validate { credential ->
                if (credential.payload.audience.contains(config.audience)) JWTPrincipal(credential.payload) else null
            }
        }
    }
}
Then in the Application file initialize our classes :
val tokenService = JwtTokenService()
val tokenConfig = TokenConfig(

    issuer = System.getenv("jwt.issuer").toString(),
    audience = System.getenv("jwt.audience").toString(),
    expiresIn = 365L * 1000L * 60L * 60L * 24L,
    secretKey = System.getenv("JWT_SECRET")
)

val hashingService = SHA256HashingService()
Pass them to the configureRouting function and then, to the routes required.
Using the token to authorize the users.
The generated token must be saved on the client side and it should be passed into the Headers block for every further request we make to our server.
fun Route.getUserId(){
    authenticate{
        get("secret") {
            val principal = call.principal<JWTPrincipal>()
            val userId = principal?.getClaim("userId",String::class)
            call.respond(HttpStatusCode.OK,"$userId")
        }
    }
}
The authenticate{} block here is provided by JWT and it ensures that requests to every route defined inside the block contain a JWT token in the header otherwise it would return with an unauthorized request status code.
JwtPrincipal is a class provided by JWT that would help us in retrieving the claim with which we generated our token.
That's all for the JWT authentication/authorization and encryption setup, it'll help you to build a strong base for your backend which you can scale easily in the future.
If you've any other doubts feel free to DM me.
Thanks, hope this article helps you in implementing what you need :)